


Getting kids outside and engaging their hands in nature is one of the most effective ways to support childhood development. Creative sensory play builds fine motor skills, boosts cognitive function, and encourages independent problem-solving. If you want to transform your backyard into an interactive learning environment, adding a mud kitchen and an outdoor chalkboard is the perfect starting point.
You do not need a massive lawn to create an engaging outdoor play space. Compact, hands-on creative stations work perfectly in small yards, patios, and side gardens. By using upcycled materials and smart yard design, you can build spaces that invite toddlers and preschoolers to dig, pour, draw, and explore.
Below is a detailed guide featuring 17 backyard mud kitchen and outdoor chalkboard ideas. Each setup is designed to maximize tactile learning, imaginative play, and nature exploration right in your own backyard.
1. Recycled Pallet Mud Kitchens
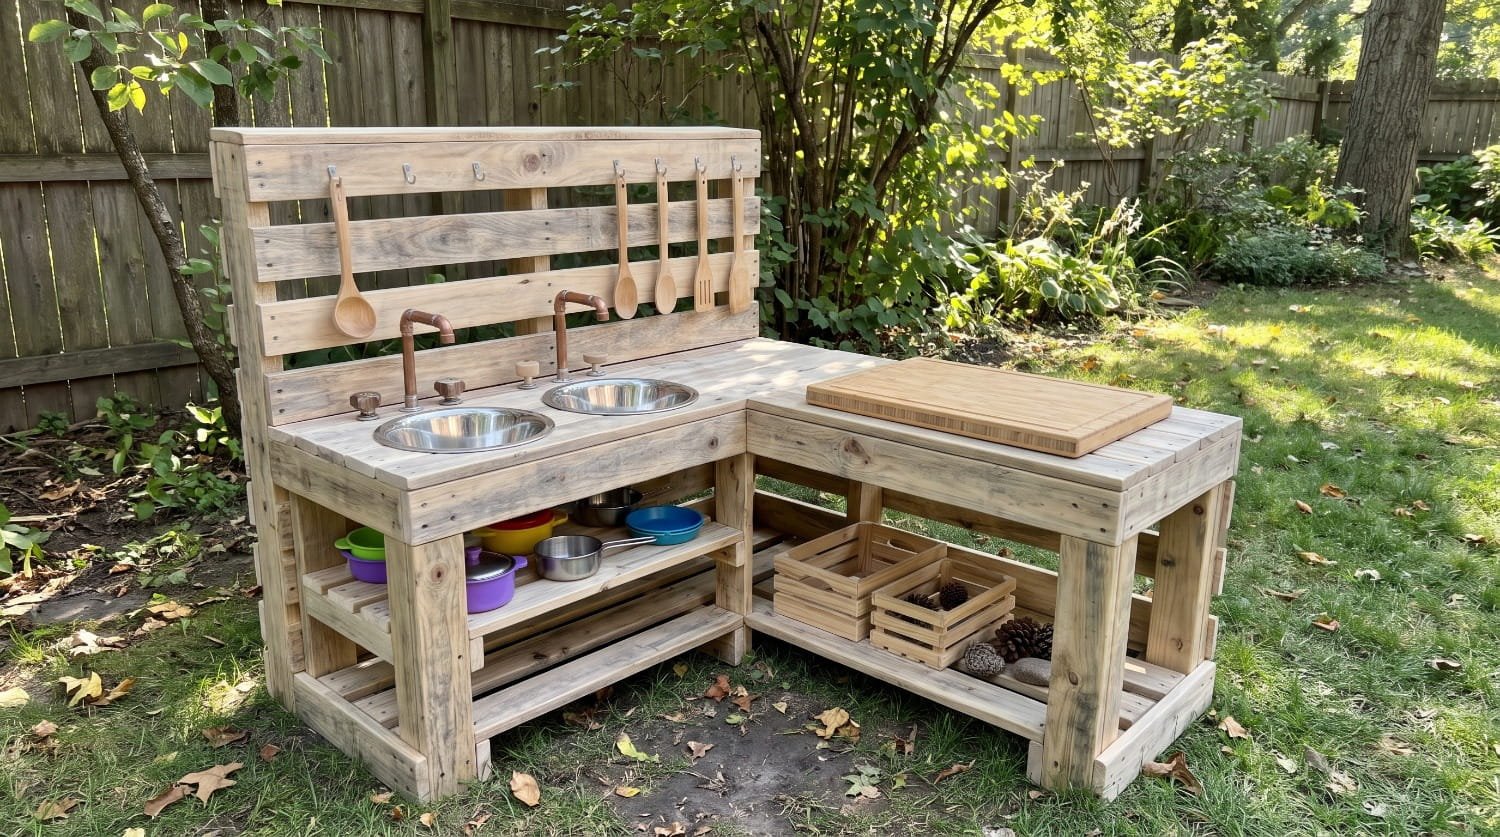
Building a mud kitchen from recycled pallets is cost-effective, environmentally friendly, and highly customizable. It provides a dedicated station for children to mix mud, water, and sand without ruining your patio furniture. The rustic look of pallet wood blends seamlessly into a natural garden setting.
When sourcing pallets, always check the stamps to ensure you are using untreated wooden pallets rather than chemically treated ones. This keeps the play area safe for little hands.
Materials to include in your pallet kitchen:
- Removable stainless steel bowls for easy dumping and cleaning
- Bamboo cutting boards for chopping leaves and mashing clay
- Wooden ladles, spoons, and spatulas for mixing mud potions
- A low shelf underneath to store old pots and pans
Learning Benefits
- Encourages imaginative role-play as children pretend to cook and bake.
- Builds fine motor skills through grasping, stirring, and transferring materials.
- Provides intense tactile stimulation through the texture of wet dirt and smooth wood.
Pro Tip: Sand down all the rough edges of the pallets before assembly to prevent splinters, and apply a non-toxic, weather-resistant sealant to make the kitchen last through the seasons.
2. Gravity Water and Stream Zones

Water play is a fundamental component of sensory exploration. A gravity water and stream zone teaches kids about physics, flow, and cause-and-effect in a completely hands-on way. You can build this in a corner of the yard that naturally slopes, or create an artificial incline using piled earth or a wooden ramp.
Detail a slightly sloped stone bed where water can pool and drain safely. Equip the station with a combination of rigid PVC pipes and flexible rubber tubes. By providing loose rocks and small blocks of wood, you allow kids to dam and redirect flowing water.
Key features of a gravity water zone:
- A working hand water pump or a durable hose attachment at the highest point
- Half-cut PVC pipes that act as open aqueducts
- Pebbles, stones, and sand for building temporary dams
- A lower drainage area planted with water-loving plants to prevent yard flooding
Learning Benefits
- Introduces early STEM concepts like gravity, flow, and cause and effect.
- Builds gross motor skills as children pump the heavy water handle.
- Promotes problem-solving skills as kids figure out how to stop or redirect the water.
Pro Tip: Place a large hidden basin at the bottom of the slope to catch the runoff water. You can then use this captured water for your garden or cycle it back to the pump.
3. Fence-Mounted Nature Art Stations

When yard space is limited, using vertical space is the best solution. A fence-mounted nature art station combines the benefits of drawing with the textures of the natural world. Mounting an outdoor chalkboard on a fence line gives children a massive canvas for gross motor movement as they stretch and reach to draw.
Enhance the chalkboard by installing a small wooden ledge beneath it. Pair this setup with collection baskets where children can store their daily backyard discoveries: leaves, pinecones, seed pods, and twigs.
Elements to add to your fence-mounted station:
- Weather-proof chalkboard paint applied to marine-grade plywood
- Woven or wire collection baskets for sorting natural loose parts
- Damp modeling clay or playdough for pressing leaves to make nature prints
- Jumbo outdoor chalk that is easy for toddlers to grip
Learning Benefits
- Maximizes small backyard spaces by utilizing vertical areas.
- Encourages nature observation and foraging for local plant life.
- Develops hand-eye coordination through drawing and pressing items into clay.
Pro Tip: Use a marine-grade sealant on the back and edges of the plywood before mounting it to the fence to prevent the wood from warping in the rain.
4. Acoustic and Wildlife Corners
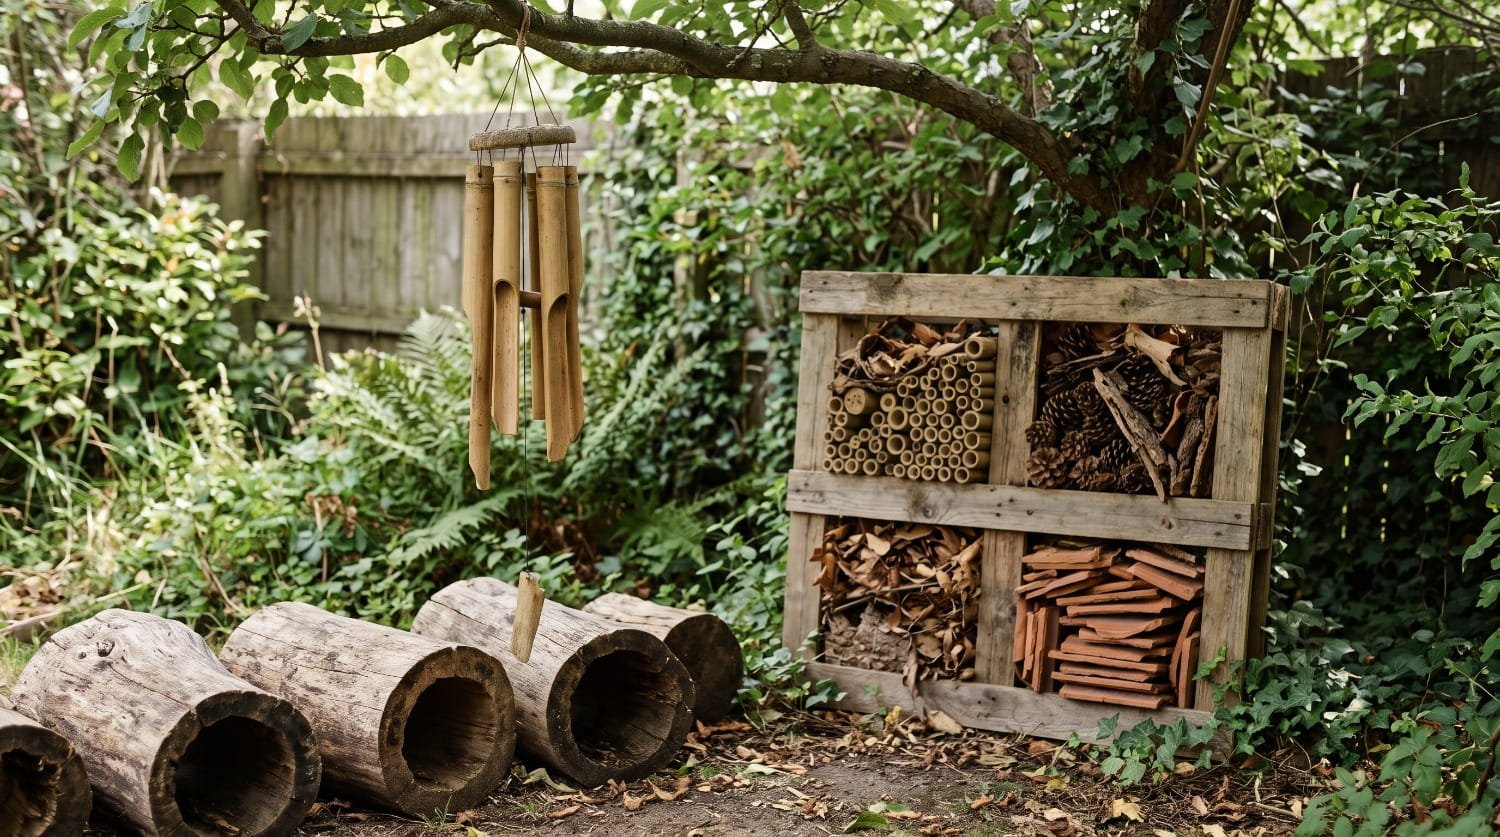
Sensory play is not just about touch; auditory and visual input are equally important. An acoustic and wildlife corner appeals to a child’s sense of hearing and their natural curiosity about insects and local ecosystems.
Start by bringing in large, hollow drumming logs that children can strike with wooden mallets or thick sticks to explore different rhythms and pitches. Hang bamboo chimes overhead to provide gentle, natural background acoustics that respond to the wind.
To encourage visual observation, construct a pallet bug hotel nearby. Pack a small wooden frame with materials that attract beneficial insects.
Components of an acoustic and wildlife corner:
- Hollowed-out logs of varying sizes for percussive play
- Bamboo or wooden wind chimes
- A sturdy bug hotel packed with bamboo tubes, pinecones, and terracotta tiles
- Magnifying glasses hanging on strings for close-up insect observation
Learning Benefits
- Stimulates auditory processing and rhythm recognition through outdoor music.
- Fosters empathy and respect for nature and backyard ecosystems.
- Provides a calming, focused activity for children who get overwhelmed easily.
Pro Tip: Place the bug hotel in a quiet, undisturbed area of the acoustic corner, preferably catching the morning sun, to attract the most beneficial insects.
5. Herb Garden and Potion Mixing Station

A potion mixing station elevates the standard mud kitchen by incorporating the sense of smell. By positioning your mud kitchen right next to an aromatic herb garden, children can harvest their own ingredients for their mud concoctions.
Plant fast-growing, hardy, and safe herbs like mint, basil, rosemary, and lavender. Children can pinch off leaves, crush them with smooth stones, and mix them into water and mud. This introduces them to basic botany, scent recognition, and the concept of infusing water.
Essential additions for a potion station:
- Small mortar and pestle for grinding leaves and flower petals
- Clear plastic jars to see the different colors of the muddy herb water
- Sturdy, child-safe herb plants at arm’s reach
- Small watering cans for the dual purpose of watering plants and mixing potions
Learning Benefits
- Enhances creative thinking and storytelling through pretend play.
- Teaches early volume and measurement concepts as they fill muffin tins.
- Strengthens hand muscles required for handwriting later in life through aggressive whisking and stirring.
Pro Tip Keep a bucket of clean play sand nearby. Mixing sand with potting soil and water creates the perfect texture for mud pies that hold their shape when turned out of a mold.
6. Mud Pie Bakery with Tiered Display Shelves

Transforming a simple mud kitchen into a specific dramatic play scenario, like a bakery, keeps older toddlers and preschoolers engaged for hours. A mud pie bakery focuses heavily on forming, molding, and decorating, which are excellent fine motor skill exercises.
Provide real baking equipment sourced from a thrift store. Muffin tins, cake pans, and pie dishes give shape to the wet earth. Add tiered wooden shelves so the children can proudly display their finished creations. They can use nature’s loose parts as “sprinkles” and “frosting.”
Bakery supplies for outdoor play:
- Metal muffin tins, loaf pans, and whisking bowls
- Squeeze bottles filled with water to get the mud to the perfect baking consistency
- Gravel, flower petals, and seeds to serve as decorations
- A small chalkboard sign where kids can name their bakery and write down the daily menu
7. The Double-Sided Freestanding Paint and Chalk Station

If you cannot mount a board to your fence, a freestanding double-sided station is an excellent alternative. This compact design allows two children to engage in creative play simultaneously, reducing conflict and encouraging collaborative conversations.
Make one side a traditional outdoor chalkboard and the other side a transparent acrylic board for painting. The acrylic side is particularly fun because children can paint while looking through the board at their friends or the garden behind them. It can easily be wiped down with a garden hose when playtime is over.
Features of a freestanding station:
- Heavy, wide base to prevent tipping in the wind
- A bottom tray on both sides to hold chalk, paintbrushes, and cups
- Chalkboard side for dry, dusty textures
- Clear acrylic side for wet, slippery paint textures
8. Corner Compact Mud Kitchen with Upcycled Sink Basins
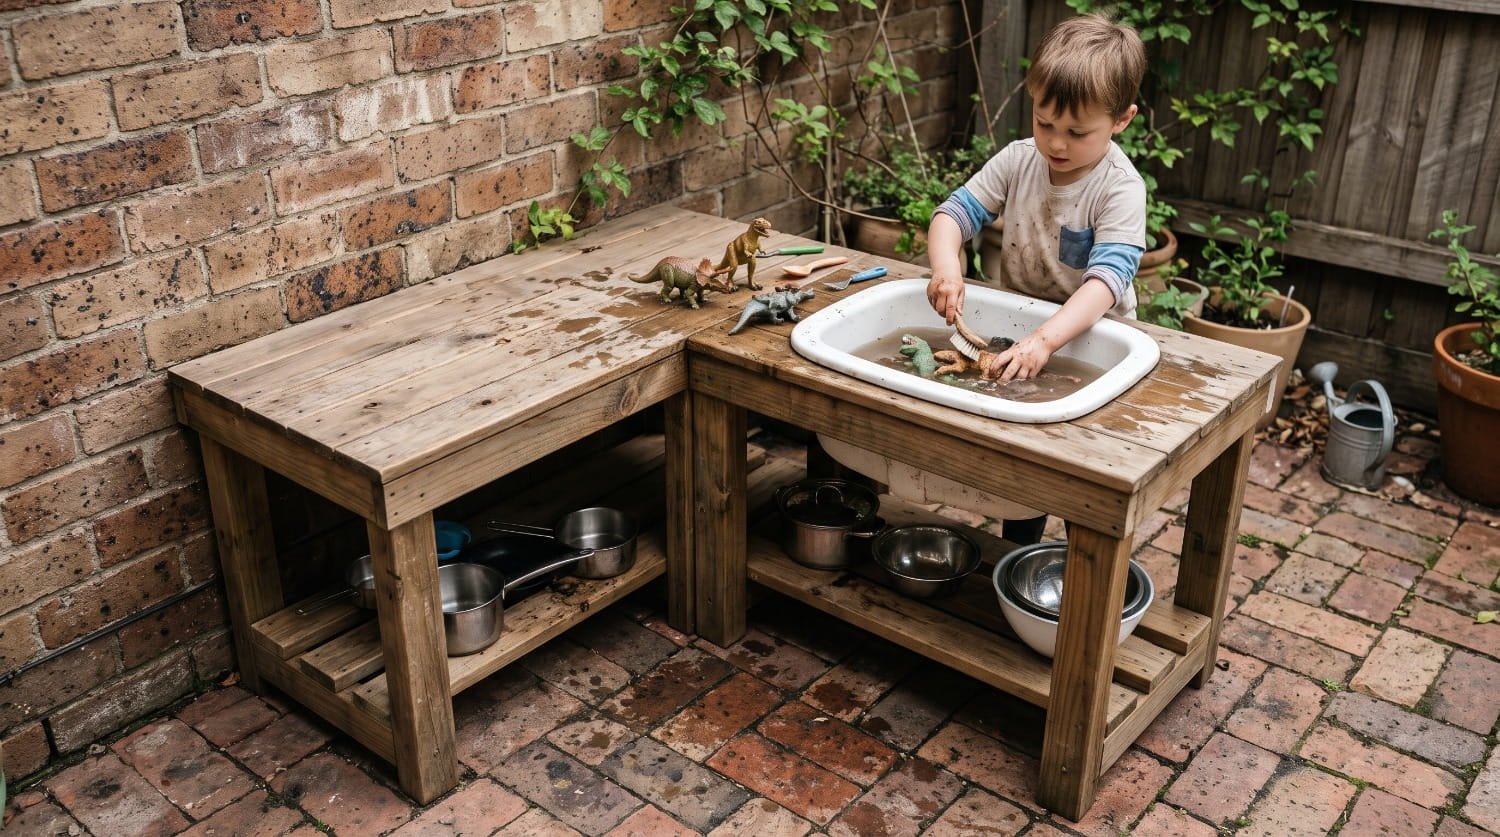
For families with very limited patio space, an L-shaped corner kitchen maximizes usable play area without protruding into the main yard. Using a real, upcycled shallow sink basin adds a touch of authenticity that children love.
You can often find old sinks at salvage yards or habitat restoration stores. Mount it securely into a wooden frame. Because it is in a corner, you can use the two adjacent walls to hang utensils, reducing the need for bulky shelving.
Space-saving corner elements:
- Upcycled shallow basin (porcelain or stainless steel)
- Wall-mounted magnetic strips to hold metal spoons and ladles
- Under-sink storage bins for storing mud and sand when not in use
- Compact footprint that fits onto apartment balconies or small patios
9. Chalkboard Tabletop for Horizontal Art
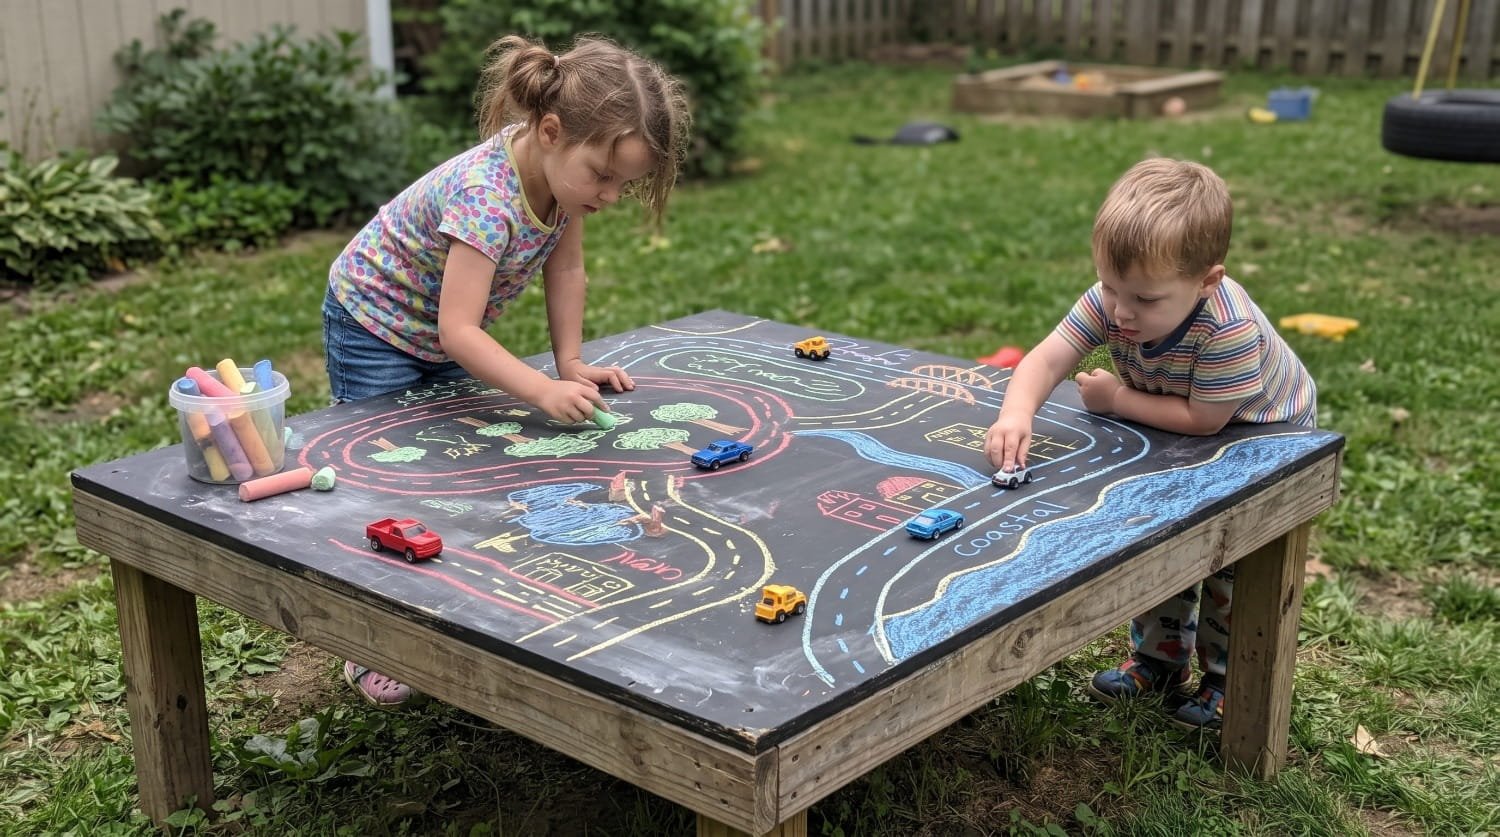
Not all chalkboard play has to be vertical. A chalkboard tabletop provides a horizontal surface that is perfect for drawing maps, playing games, or doing leaf rubbings.
By painting a low outdoor coffee table or a custom wooden stump table with heavy-duty chalkboard paint, you create a multipurpose station. Children can use it to map out roads for their toy cars, practice writing their letters, or as a flat surface for their mud pie bakery prep.
Benefits of a horizontal chalkboard:
- Encourages leaning and core stability while drawing
- Provides a wide surface for collaborative drawing and board games
- Easy to wash clean with a bucket of water and a sponge
- Doubles as a picnic table for outdoor snack time
10. Sensory Sand and Gravel Digging Pits
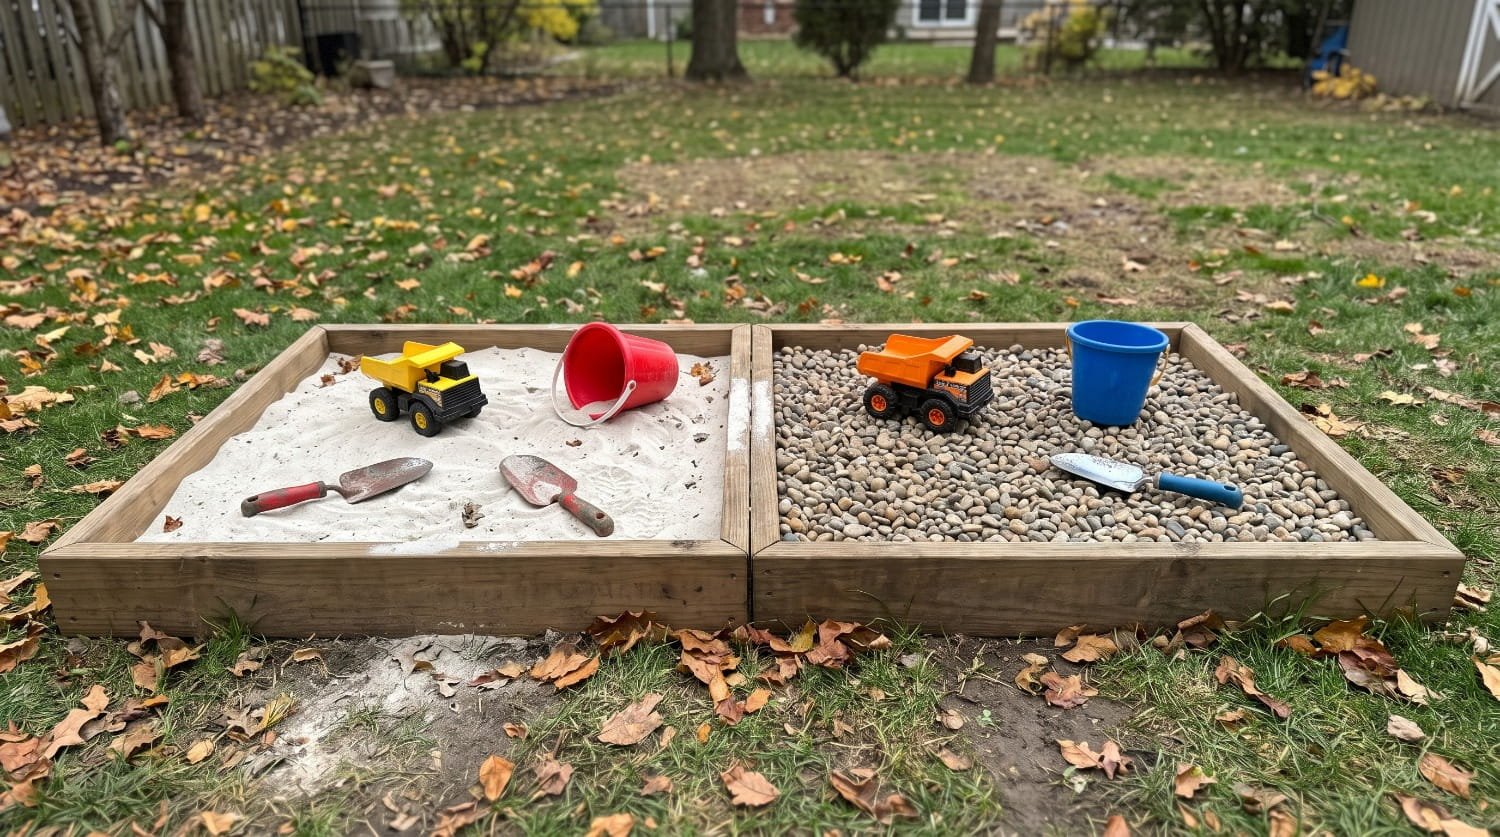
While mud is fantastic, offering contrasting textures nearby enhances the sensory experience. Building shallow digging pits next to your mud kitchen allows children to compare how different materials feel, move, and combine with water.
Create two distinct zones: one for fine play sand and one for smooth pea gravel. Kids will quickly learn that sand clumps together when wet, while gravel allows water to drain right through. This is foundational scientific observation happening naturally through play.
Digging pit essentials:
- Weed barrier fabric laid at the bottom for drainage and weed prevention
- Smooth, washed pea gravel (avoid sharp driveway gravel)
- Safe, non-toxic play sand
- Metal trowels, hand rakes, and construction vehicles for scooping and dumping
11. The Cafe Window Setup
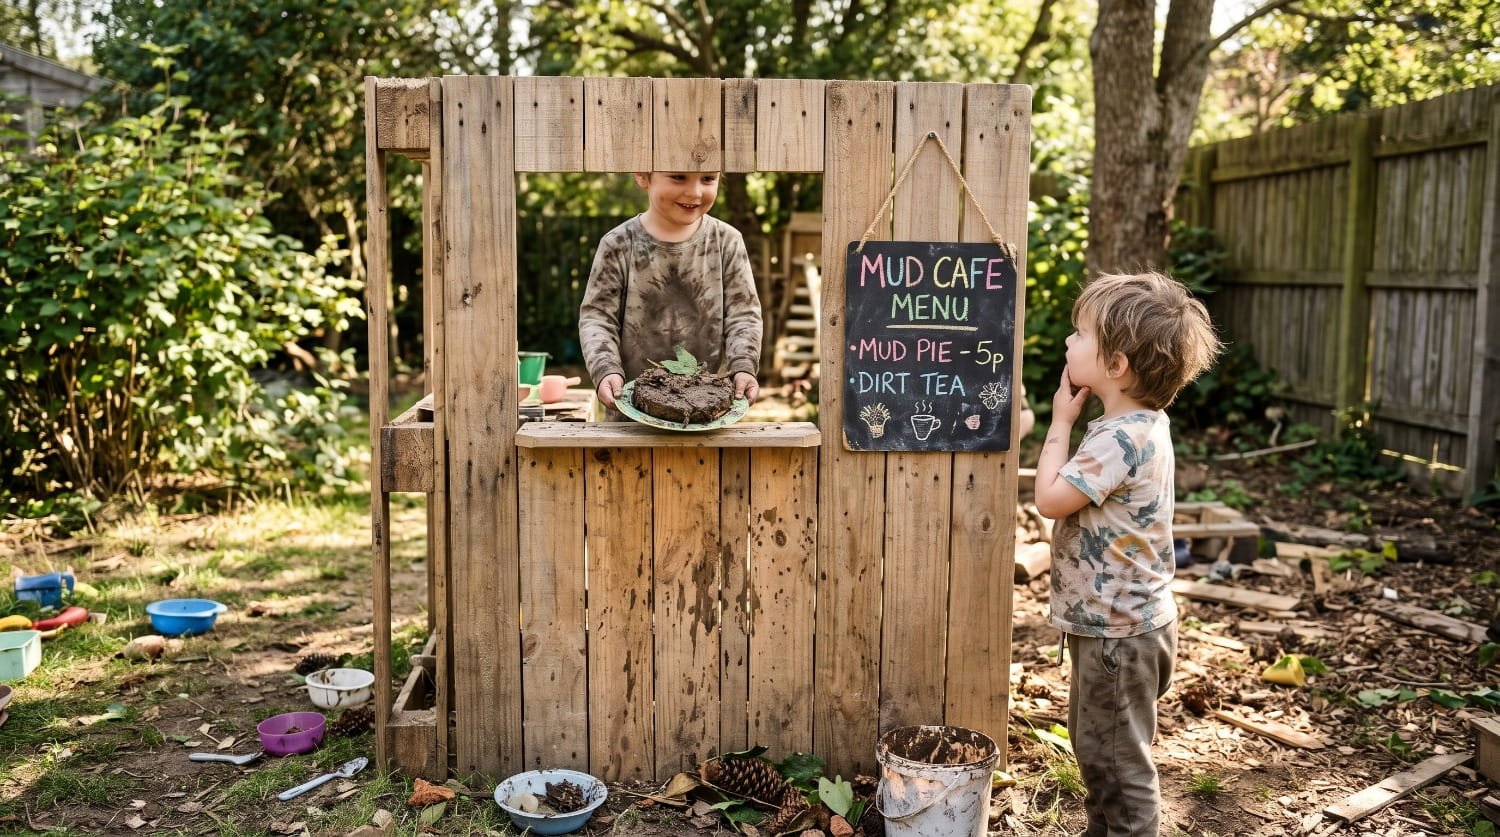
Encourage cooperative play by building a mud kitchen with a service window. This design features a tall front wall with a cutout rectangle, mimicking a cafe, food truck, or drive-through window.
This setup naturally divides the play into “customer” and “chef” roles. The customer stands on the outside, reading a chalkboard menu and placing orders, while the chef mixes mud and water on the inside to fulfill the request. This layout is incredible for language development, taking turns, and understanding social roles.
Cafe window additions:
- A small awning made from outdoor canvas to provide shade
- A hanging chalkboard beside the window to write the daily specials
- A small bell the “chef” can ring when the mud food is ready
- A small ledge on the window cutout for sliding plates back and forth
12. Magnetic Chalkboard Wall for Outdoor Play

Combining magnetic properties with a chalkboard surface creates a multi-layered educational tool. By applying magnetic primer beneath your outdoor chalkboard paint (or using a galvanized steel sheet painted with chalkboard paint), you add a completely new dimension to the art station.
Children can use magnetic letters, numbers, and shapes alongside their chalk drawings. They can trace the magnets, sort them by color, or use magnetic gears to create moving wall puzzles.
Ways to use a magnetic outdoor board:
- Spelling nature words (BUG, MUD, SUN) with magnetic letters
- Using magnetic clips to hold up pieces of paper for outdoor painting
- Creating chalk pathways connecting different magnetic shapes
- Easy reorganization of tools if you use magnetic hooks to hang buckets of chalk
13. Foraging Wall with Hanging Metal Buckets

A foraging wall teaches children organization, classification, and sorting skills. It serves as an excellent companion to both the mud kitchen and the art station.
Install a wooden pegboard or a slatted wooden fence panel and attach a series of hooks. Hang small, durable metal or plastic buckets from these hooks. Send your children on a scavenger hunt around the yard to forage for specific items to fill the buckets. Once filled, these natural elements become the loose parts used for mud cooking or clay pressing.
Sorting categories for foraging buckets:
- By color (green leaves, brown twigs, yellow dandelions)
- By texture (rough bark, smooth stones, soft moss)
- By weight (heavy rocks, light feathers)
- By type (seeds, petals, grass)
14. The Mini Car Wash and Scrubbing Station
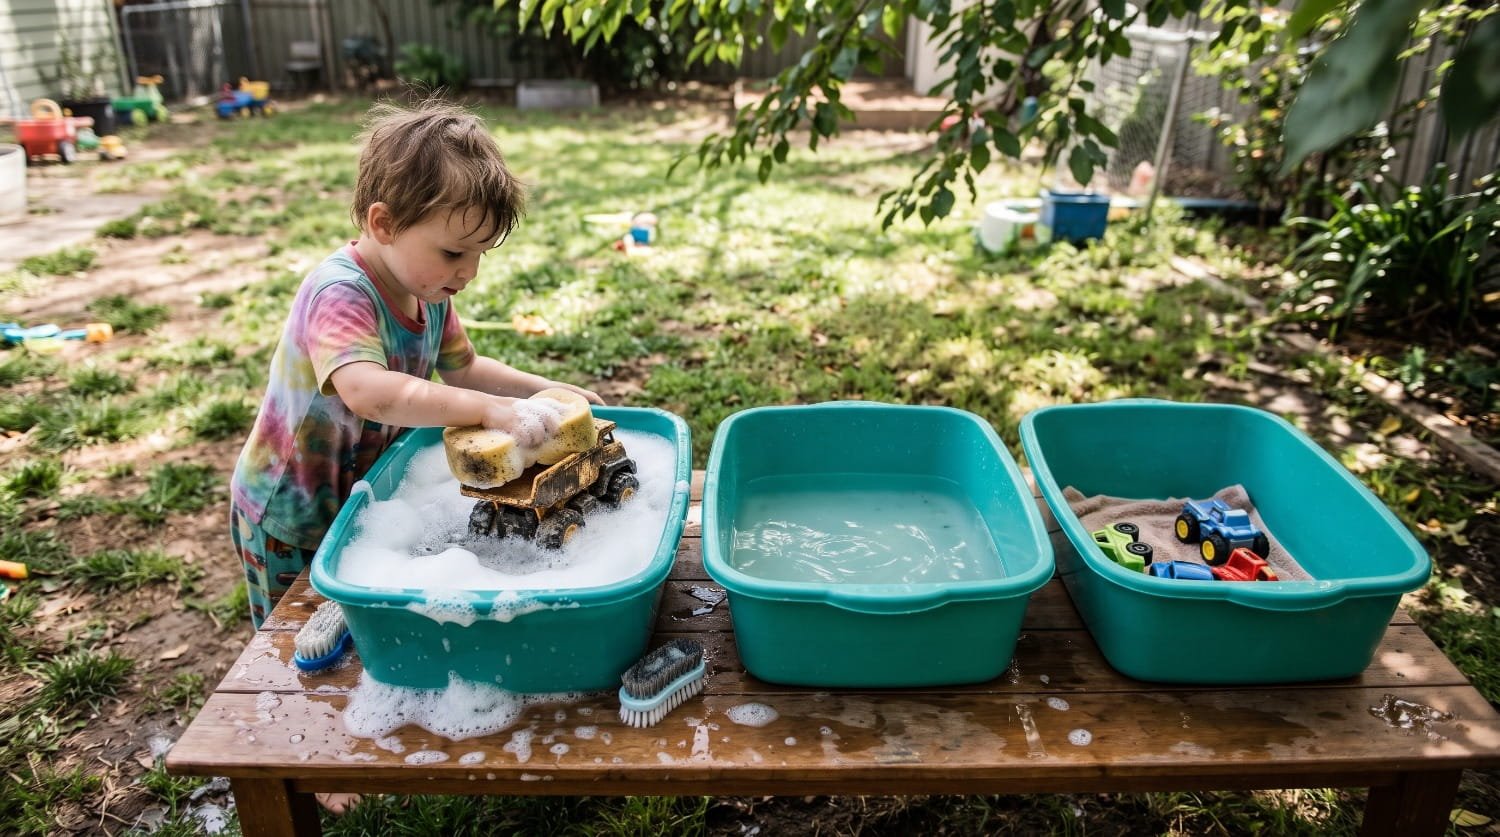
Cleaning up should be just as fun as making the mess. A scrubbing station is a highly effective way to transition children out of muddy play while still providing sensory input. It relies on the tactile sensation of warm, soapy water and rough sponges.
Set up a sequence of tubs: one with soapy water for scrubbing, one with clean water for rinsing, and a drying area with towels. Children can run their muddy toy cars, plastic dinosaurs, or even their mud kitchen pots and pans through the “car wash.”
Scrubbing station materials:
- Tear-free, child-safe soap or baby shampoo for lots of bubbles
- A variety of scrubbing tools: sponges, old toothbrushes, and bottle brushes
- Deep, sturdy plastic tubs that will not easily tip over
- Microfiber towels for drying
15. Portable Rolling Mud Kitchen Cart
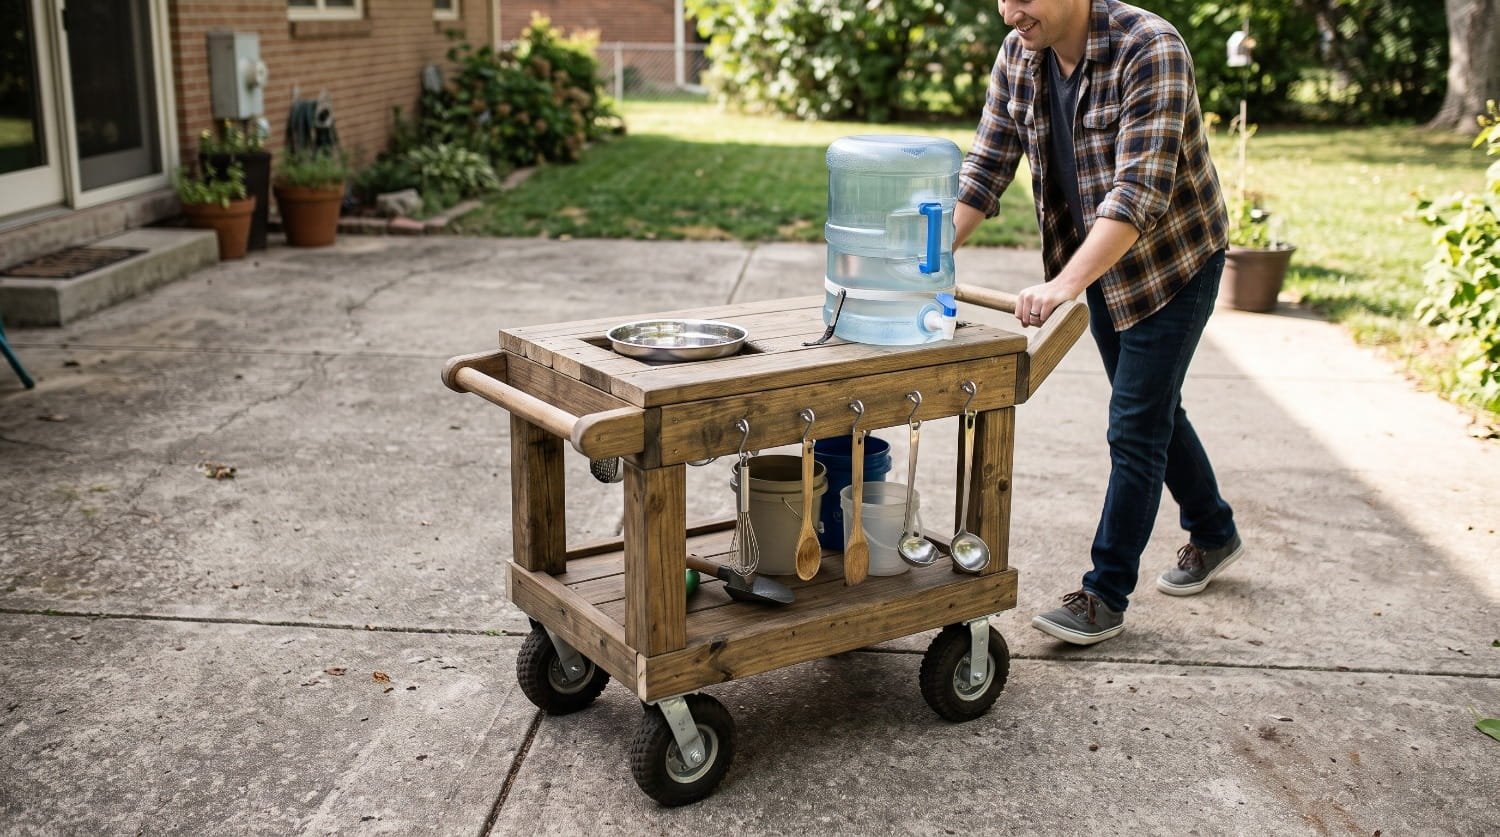
If you live in an area with unpredictable weather or you simply want to keep your patio clean when hosting guests, a portable rolling mud kitchen is the ideal solution. Built onto a sturdy wooden cart with heavy-duty locking casters, this kitchen can be moved into the sun on chilly days or into the shade during the peak heat of summer.
To keep it fully independent from garden hoses, equip the cart with a large camping water jug featuring a push-button spout. Children can dispense their own water into the mixing bowls without needing continuous access to the main tap.
Portable cart features:
- All-terrain, locking caster wheels
- A self-contained water dispenser
- Lightweight but durable cedar or redwood construction
- Compact size that rolls easily into a garage or shed for winter storage
16. Color-Sorting Chalkboard Grid
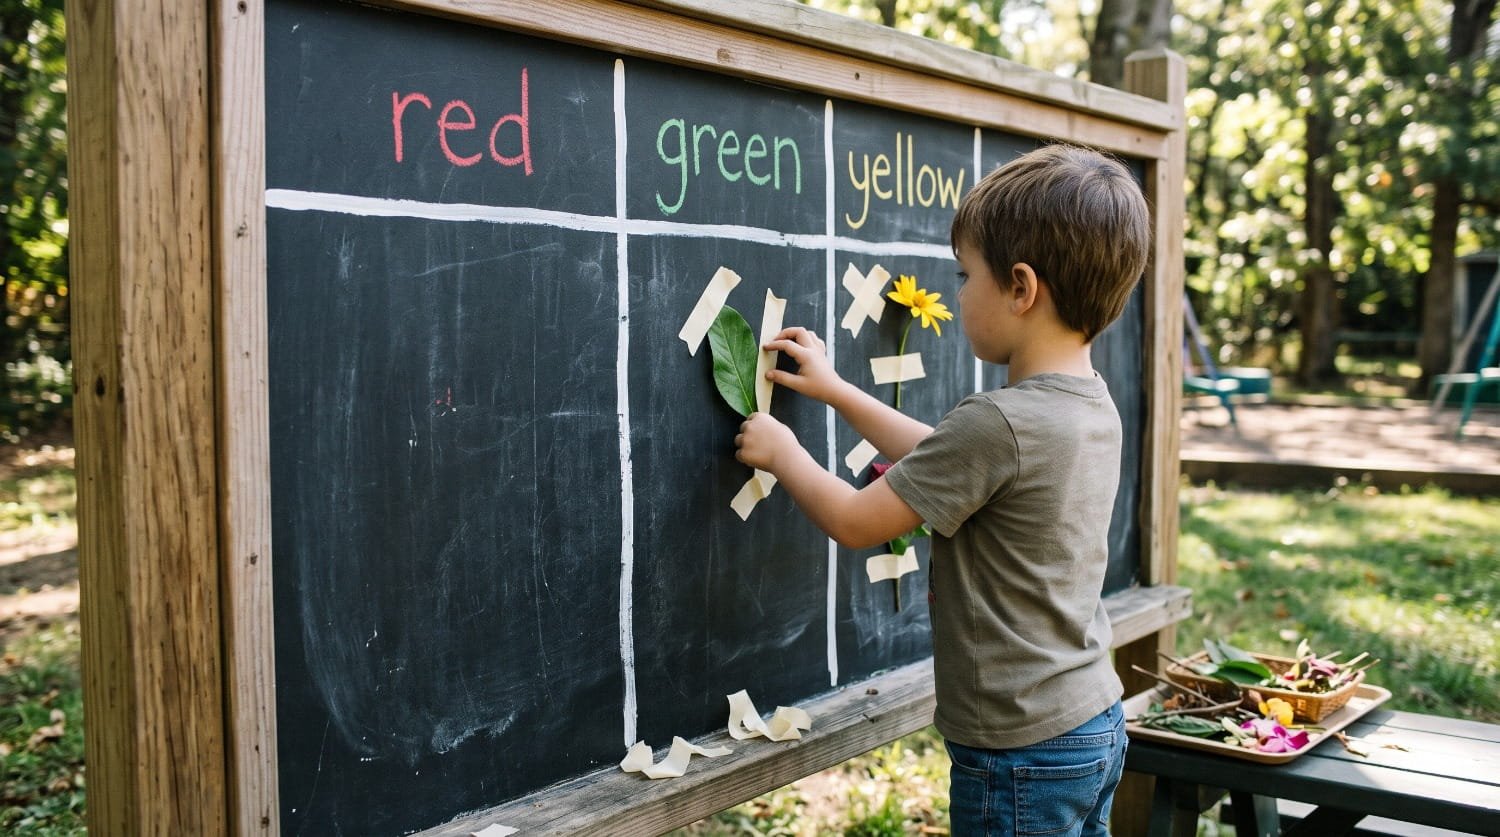
Integrate cognitive development directly into your backyard art station by creating a permanent or semi-permanent color-sorting grid on your chalkboard. Use white outdoor paint to draw the lines, leaving the inside of the grid boxes blank for the children to use.
Kids can forage for items in the yard and tape or stick them into the correct color categories. Alternatively, they can use colored chalk to draw items that match the color at the top of the column. This teaches categorization, color recognition, and following instructions.
Grid ideas for outdoor chalkboards:
- Color sorting (matching leaves and flowers to chalk colors)
- Shape sorting (finding round rocks, straight sticks)
- Tic-tac-toe boards for quick outdoor games
- Tally mark charts to count how many bugs or birds they see in the yard
17. Winter-Ready Snow and Ice Kitchen
Outdoor sensory play is one of the most effective ways to support a child’s cognitive, physical, and emotional development. When children dig in the dirt, mix mud, pour water, and draw with chalk, they are not just making a mess. They are building fine motor skills, exploring early science concepts, and engaging in deep, imaginative pretend play.
However, many parents assume that setting up a backyard learning environment requires a massive lawn or a huge budget. This is simply not true. You can create compact, hands-on creative stations that work in any yard size, from sprawling suburban lawns to tight urban patios. By combining the messy, tactile fun of mud kitchens with the creative freedom of outdoor chalkboards, you can build a complete sensory hub for your kids.
This guide covers 17 unique, actionable ideas to transform your backyard into an outdoor learning space using upcycled materials, natural elements, and simple tools.
2. Gravity Water and Stream Zones

Water play is a fundamental part of sensory exploration. You can build a dynamic water station in a small corner of your yard by utilizing gravity. Detail a slightly sloped stone bed filled with smooth river rocks. Lay down various lengths of PVC pipes and flexible rubber tubes. At the top of the slope, install a simple hand water pump. Kids can pump the water and watch it flow down the channels. They can use mud, rocks, and leaves to dam the water and redirect the flowing streams, experimenting with fluid dynamics.
Key Materials
• Smooth river stones and gravel
• PVC pipes in various widths
• Flexible rubber tubing
• Manual hand water pump
• Plastic catch basin for the bottom
Learning Benefits
• Introduces early STEM concepts like gravity, flow, and cause and effect.
• Builds gross motor skills as children pump the heavy water handle.
• Promotes problem-solving skills as kids figure out how to stop or redirect the water.
Pro Tip
Place a large hidden basin at the bottom of the slope to catch the runoff water. You can then use this captured water for your garden or cycle it back to the pump.
3. Fence-Mounted Nature Art Stations

If you have limited ground space, use your vertical space. A fence-mounted nature art station combines drawing with three-dimensional outdoor crafts. Secure a large piece of weatherproof plywood painted with chalkboard paint directly to your fence line. Below the board, attach sturdy wooden shelves to hold collection baskets. Kids can fill these baskets with leaves, pinecones, and twigs they find around the yard. Alongside the chalk, provide a block of damp clay. Children can press the natural items into the clay to make beautiful nature prints, or trace the shadows of leaves on the chalkboard.
Key Materials
• Weatherproof plywood
• Exterior grade chalkboard paint
• Woven collection baskets
• Damp modeling clay
• Jumbo outdoor chalk
Learning Benefits
• Maximizes small backyard spaces by utilizing vertical areas.
• Encourages nature observation and foraging for local plant life.
• Develops hand-eye coordination through drawing and pressing items into clay.
Pro Tip
Use a marine-grade sealant on the back and edges of the plywood before mounting it to the fence to prevent the wood from warping in the rain.
4. Acoustic and Wildlife Corners

Sensory play is not just about touch; it is also about hearing and observing. You can dedicate a corner of your yard to acoustic play and wildlife observation. Include large, hollow drumming logs that kids can hit with sticks to create deep, resonant sounds. Hang thick bamboo chimes that clack together in the breeze. Next to the music area, build a pallet bug hotel. Pack the gaps of a wooden pallet with hollow bamboo tubes, dry pinecones, and broken terracotta tiles. This invites beneficial insects like solitary bees and ladybugs, allowing kids to observe backyard wildlife safely.
Key Materials
• Hollow logs and sturdy sticks
• Thick bamboo wind chimes
• Small wooden pallet section
• Bamboo garden stakes (cut into tubes)
• Terracotta tiles and pinecones
Learning Benefits
• Stimulates auditory processing and rhythm recognition through outdoor music.
• Fosters empathy and respect for nature and backyard ecosystems.
• Provides a calming, focused activity for children who get overwhelmed easily.
Pro Tip
Place the bug hotel in a quiet, undisturbed area of the acoustic corner, preferably catching the morning sun, to attract the most beneficial insects.
5. Mud Bakery and Potion Mixing Table
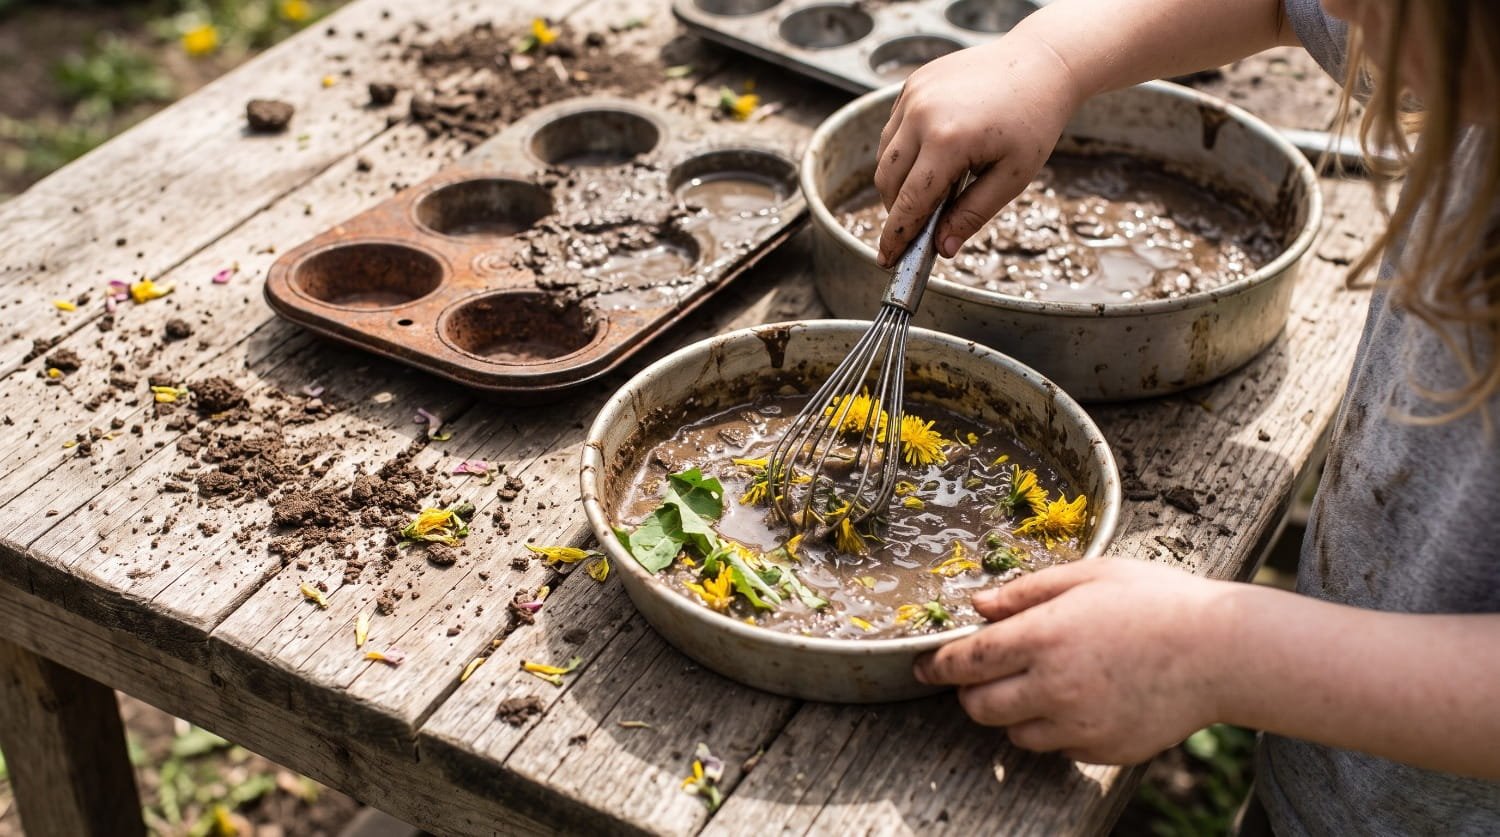
Children naturally gravitate toward making potions and baking mud pies. Dedicate a specific table solely to this imaginative play. Stock the mud bakery with thrifted kitchen supplies that are no longer used indoors. Old metal muffin tins, bundt cake pans, wire whisks, and measuring cups are perfect. Encourage kids to gather flower petals, grass clippings, and seeds to decorate their mud cakes or mix into their magical outdoor potions.
Key Materials
• Old muffin tins and cake pans
• Metal whisks and measuring cups
• Sturdy wooden play table
• A dedicated dirt or potting soil bin
• Small pitchers for pouring water
Learning Benefits
• Enhances creative thinking and storytelling through pretend play.
• Teaches early volume and measurement concepts as they fill muffin tins.
• Strengthens hand muscles required for handwriting later in life through aggressive whisking and stirring.
Pro Tip
Keep a bucket of clean play sand nearby. Mixing sand with potting soil and water creates the perfect texture for mud pies that hold their shape when turned out of a mold.
6. Repurposed Cabinet Mud Kitchen
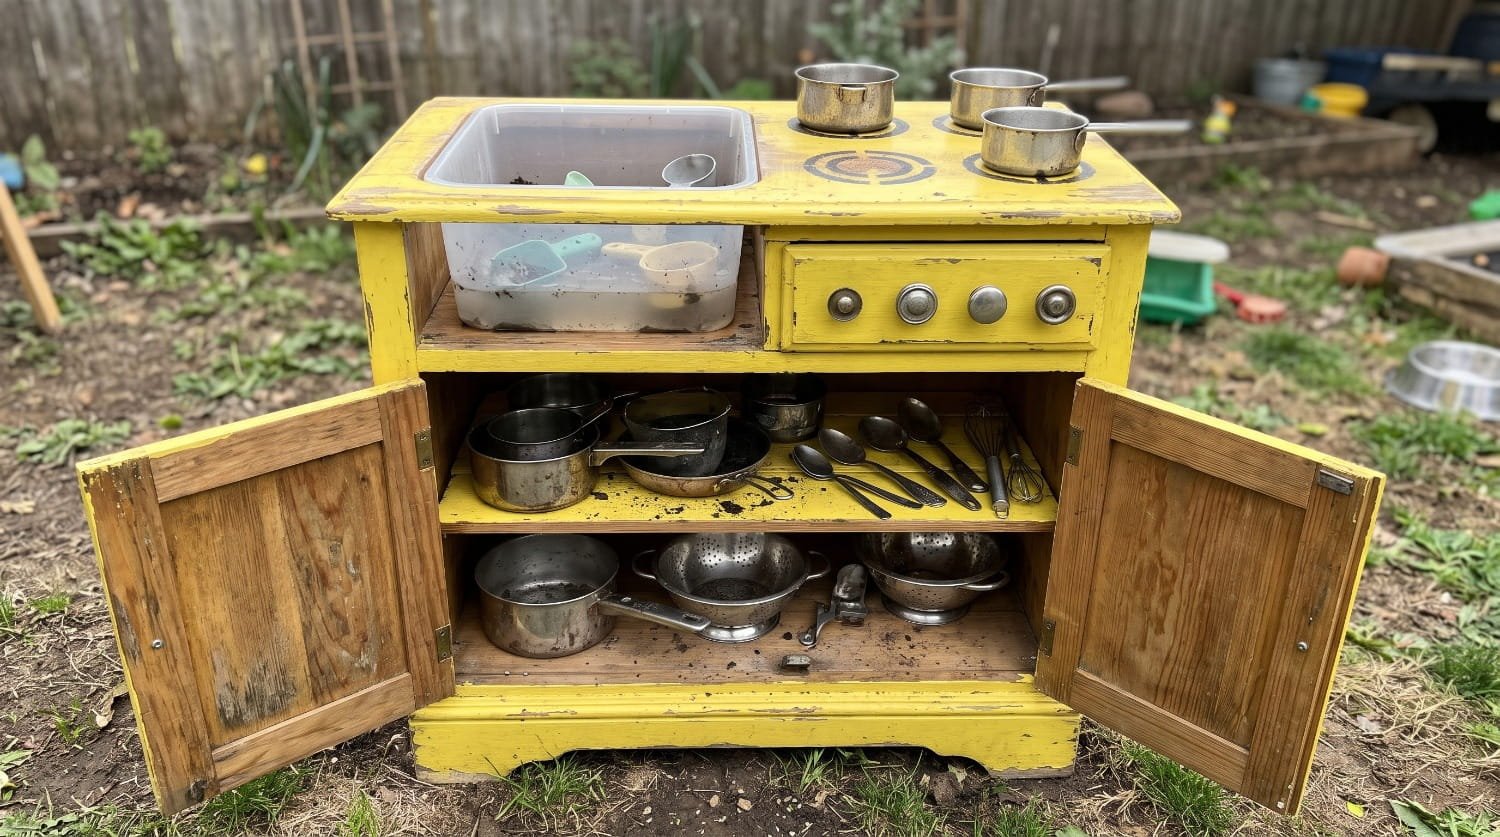
You do not need to build a mud kitchen from scratch. Upcycling an old piece of furniture, like a solid wood nightstand, dresser, or small cabinet, is a fantastic weekend project. Remove the top drawers to drop in plastic wash bins to act as sinks. Paint the furniture with a bright, durable exterior deck paint to protect it from the elements. Attach real metal hardware knobs to the front so kids can turn the dials to control their pretend stove.
Key Materials
• Old solid wood cabinet or dresser
• Exterior deck or porch paint
• Plastic wash basins
• Metal hardware knobs
• Hanging hooks for utensils
Learning Benefits
• Demonstrates the value of recycling and upcycling to children.
• Promotes independent play by providing accessible storage for their own tools.
• Develops fine motor skills through twisting and turning the stove knobs.
Pro Tip
Avoid using furniture made from particleboard or MDF, as these materials will swell and disintegrate quickly when exposed to rain and mud. Stick to solid wood.
7. Outdoor Chalkboard with Built-In Wash Station

Drawing with chalk is fun, but washing the chalkboard is often just as exciting for a child. Create a continuous loop of play by integrating a wash station directly into your outdoor chalkboard setup. Mount a standard camping water dispenser with a push-button spout on a post next to the chalkboard. Hang a bucket with thick car sponges and rags below it. Kids can draw their masterpieces, push the button to wet their sponge, wipe the board clean, and start all over again.
Key Materials
• Chalkboard surface (plywood with chalkboard paint)
• Push-button water dispenser
• Plastic bucket
• Large absorbent sponges
• Microfiber rags
Learning Benefits
• Engages gross motor skills through the wide arm movements required to wash a large board.
• Promotes independence by allowing kids to clean up their own workspace.
• Provides a soothing, repetitive sensory experience through water play.
Pro Tip
Use dustless outdoor chalk to keep the area slightly cleaner, and ensure the ground below the chalkboard has good drainage, such as gravel or wood chips, to prevent a muddy puddle from forming where they stand.
8. Compact Balcony Mini Mud Station
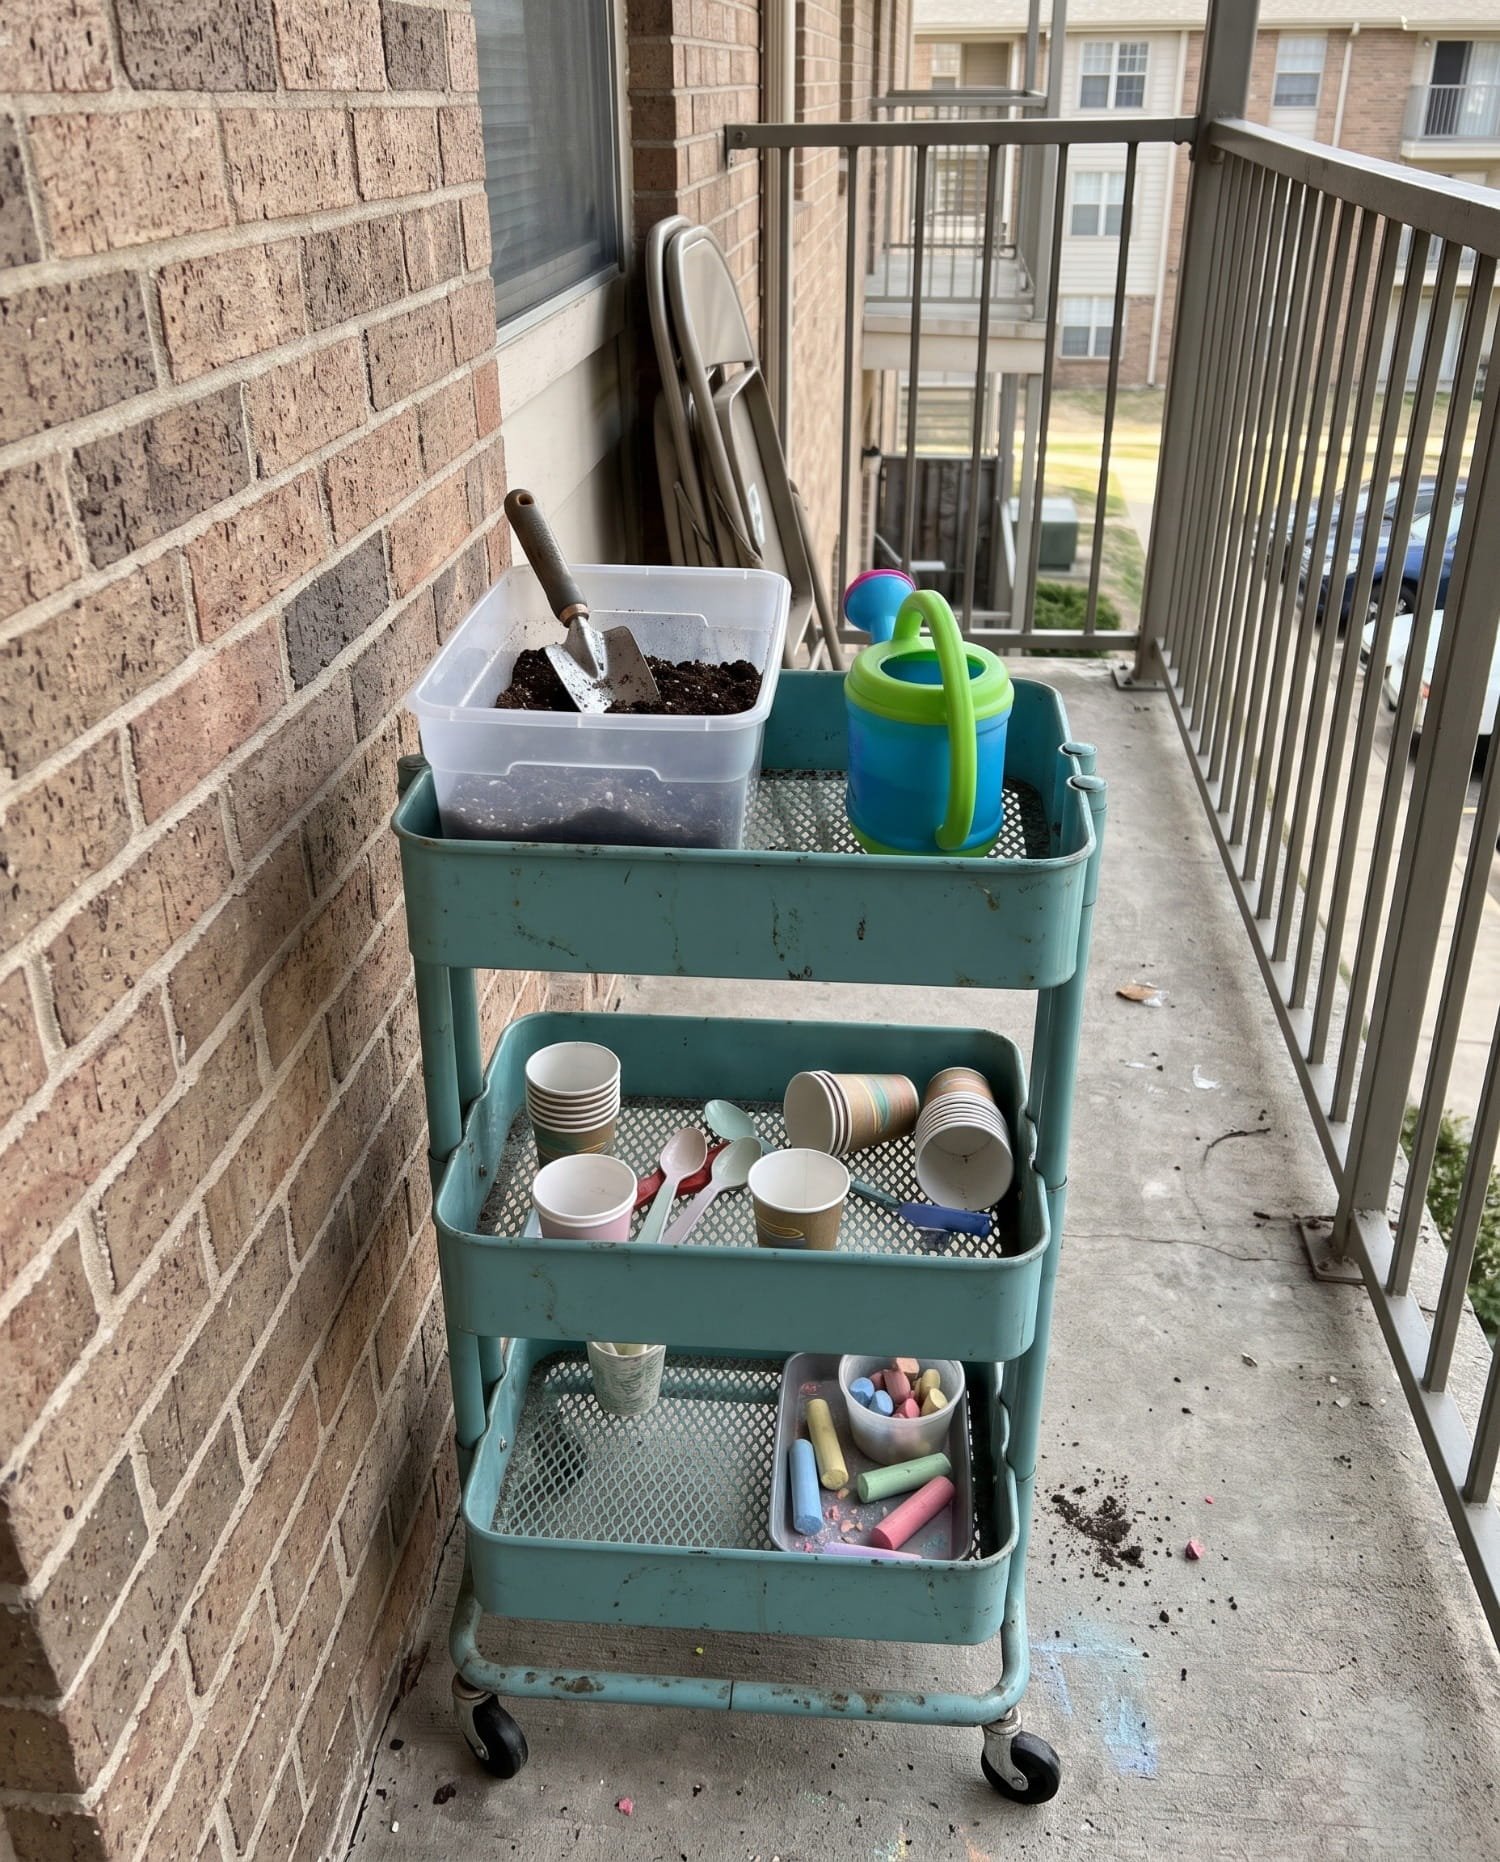
Urban families with only a balcony or a small concrete patio can still enjoy sensory play. Use a heavy-duty rolling metal utility cart to create a mobile, compact mud station. Place a shallow plastic storage bin on the top shelf to hold a small amount of potting soil and water. Keep mini watering cans, spoons, and chalk on the lower shelves. When playtime is over, you can simply roll the cart into a corner or throw a waterproof cover over it.
Key Materials
• 3-tier rolling metal utility cart
• Shallow plastic storage bins
• Mini watering cans
• Small trowels and spoons
• Waterproof grill cover (for storage)
Learning Benefits
• Proves that outdoor learning environments can exist in high-density urban housing.
• Encourages precise, focused fine motor play due to the contained space.
• Allows for easy supervision since the station can be moved near a window or door.
Pro Tip
Put a large, washable silicone mat under the rolling cart during play. This catches any spilled dirt and water, making balcony cleanup take less than a minute.
9. Sensory Bin Integration Counters
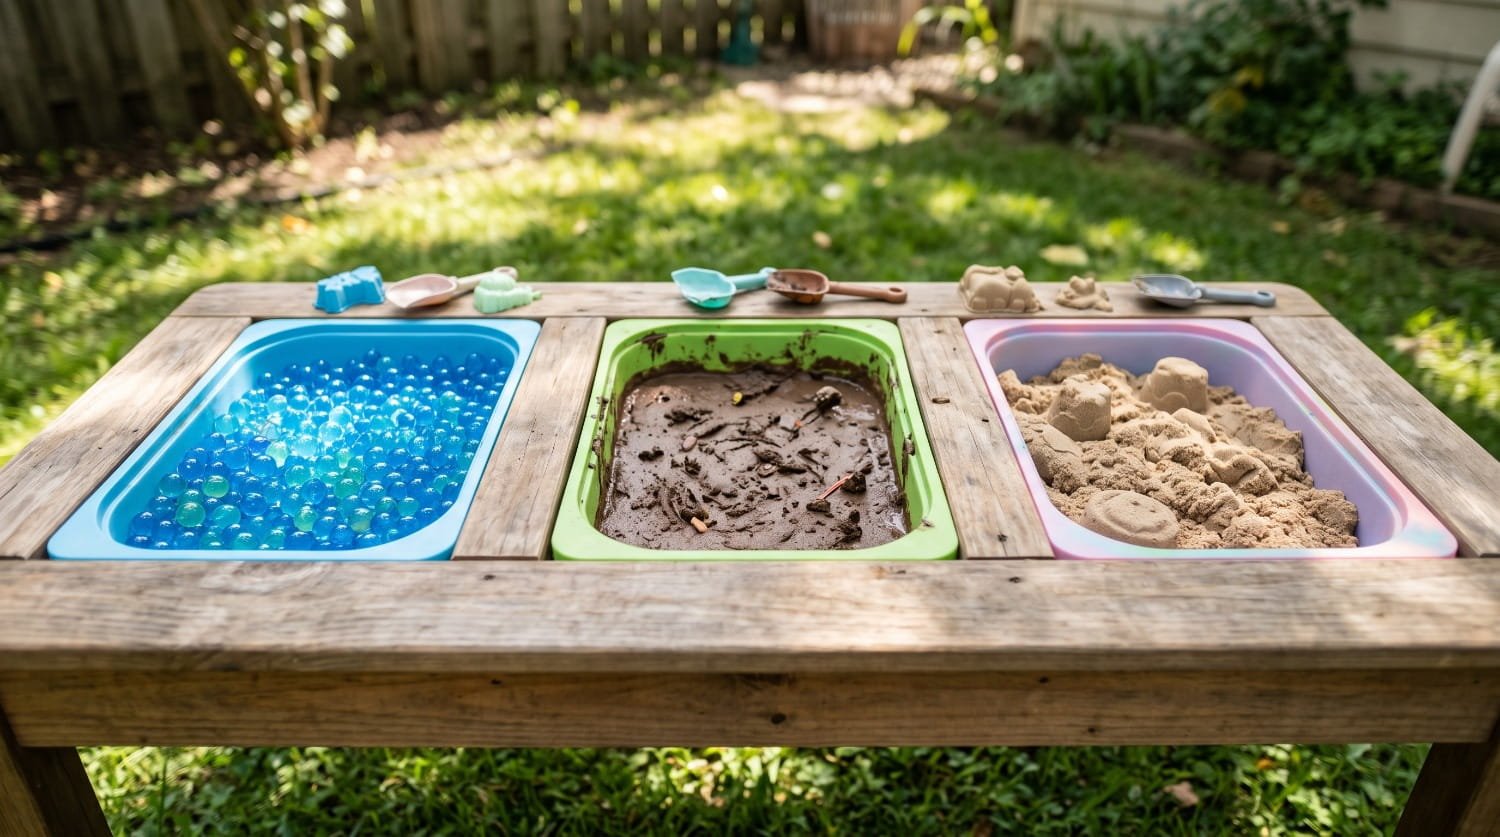
For a highly versatile play area, build a counter that features recessed, drop-in sensory bins. Cut holes into a wooden table top that perfectly fit standard plastic storage containers with lips. This allows you to easily drop the bins in and lift them out. You can change the sensory materials daily. One day the bins can hold mud and water; the next day they can hold dry corn kernels, kinetic sand, or soapy water.
Key Materials
• Wooden play table
• Jigsaw for cutting holes
• Removable plastic bins with overlapping lips
• Various sensory bases (sand, dirt, water beads)
• Lids for the plastic bins
Learning Benefits
• Offers a constantly rotating variety of tactile experiences to prevent boredom.
• Supports children with sensory processing needs by allowing them to choose their preferred textures.
• Makes cleaning and swapping materials incredibly efficient for parents.
Pro Tip
Always keep the lids for your plastic bins. When playtime is over, simply snap the lids onto the recessed bins to protect the sensory materials from rain and backyard animals overnight.
10. Freestanding Dual-Sided Chalkboard Easel

If you cannot mount a chalkboard to a wall or fence, a freestanding A-frame easel is the perfect solution. Construct a sturdy A-frame out of weather-treated lumber and attach plywood to both sides. Paint both sides with exterior chalkboard paint. This dual-sided design is excellent for siblings or playdates, as two children can draw simultaneously without bumping elbows or fighting over space. It can also easily be folded up and stored in a garage during extreme weather.
Key Materials
• Weather-treated lumber for the frame
• Heavy-duty hinges
• Plywood boards
• Exterior chalkboard paint
• Chain or rope to stabilize the A-frame
Learning Benefits
• Encourages parallel play and social interaction among siblings and friends.
• Allows children to practice drawing vertically, which strengthens wrist and shoulder stability.
• Promotes spatial awareness as kids navigate around the freestanding structure.
Pro Tip
Attach a small wooden trough or a plastic gutter strip to the bottom edge of both sides of the easel to catch falling chalk dust and hold the chalk pieces.
11. Herb Garden and Scent Mixing Station
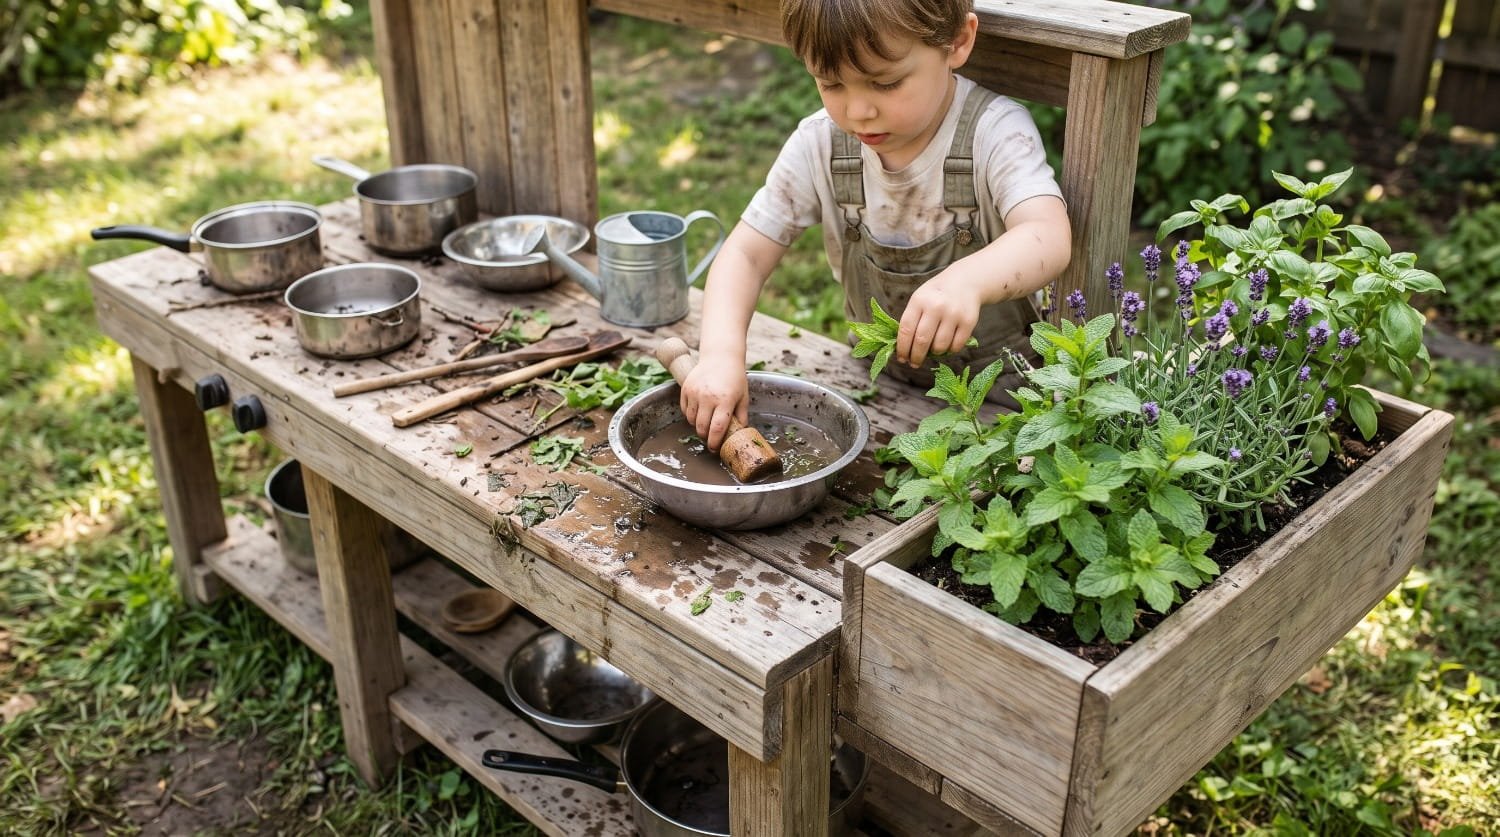
Elevate the sensory experience by incorporating olfactory play. Attach a small planter box directly to the side of your mud kitchen and plant sturdy, aromatic herbs like mint, basil, lavender, and rosemary. Provide the children with a wooden mortar and pestle. They can harvest the fresh leaves, crush them up, and mix them into their mud concoctions. This fills the air with wonderful natural scents and teaches children about plant identification.
Key Materials
• Wooden planter box
• Potting soil
• Aromatic herb plants (mint, lavender, lemon balm)
• Wooden mortar and pestle
• Child-safe gardening clippers
Learning Benefits
• Introduces olfactory sensory input, which is deeply connected to memory and emotional regulation.
• Teaches basic botany, gardening skills, and plant care.
• Provides a highly calming and grounding sensory experience through natural aromatherapy.
Pro Tip
Mint grows incredibly fast and is very resilient, making it the perfect plant for rough little hands that might pick too many leaves at once.
12. Stone and Pebble Sorting Mud Kitchen
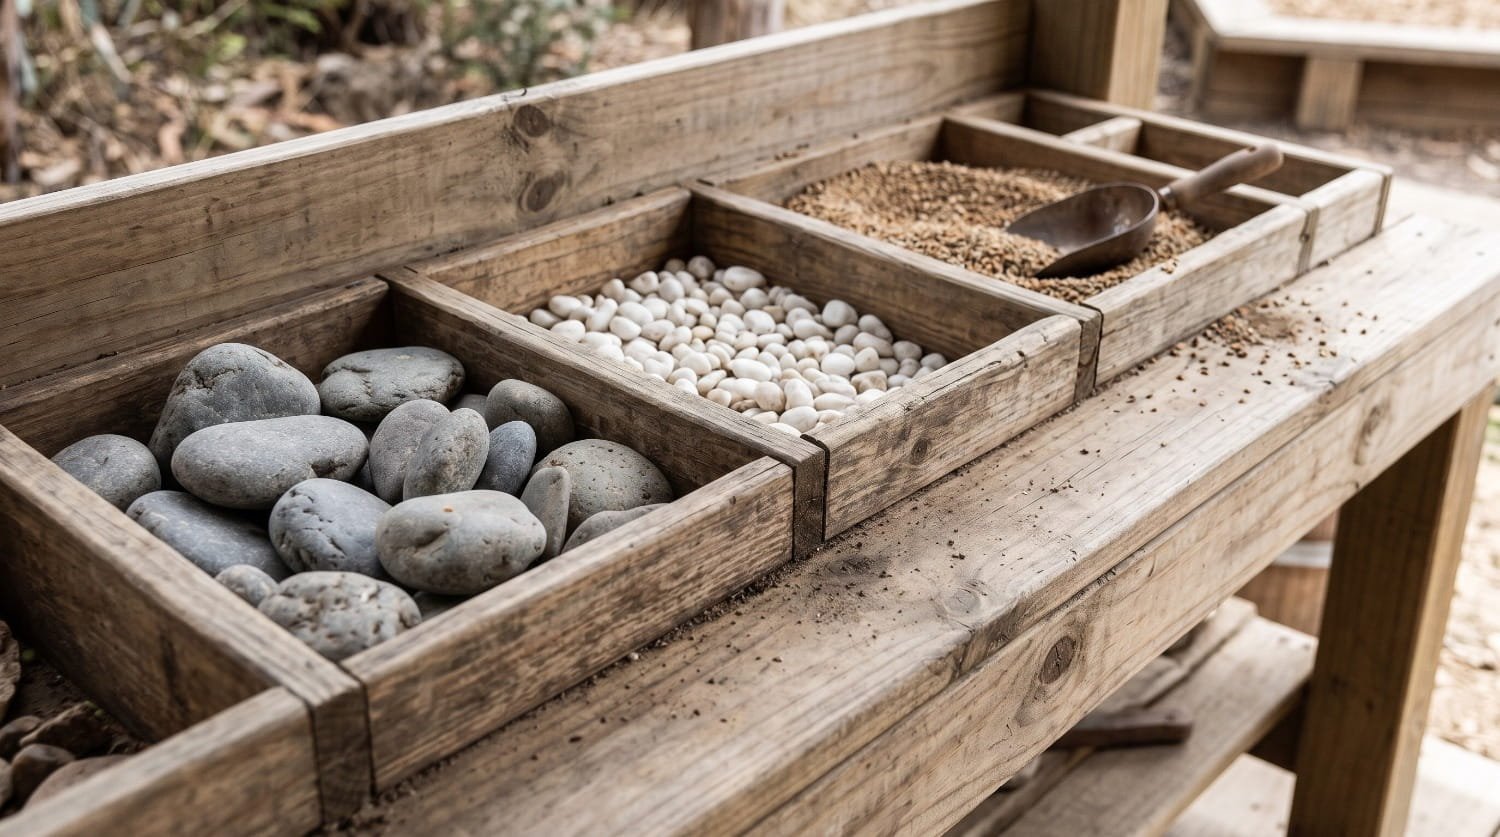
Sorting and classifying are fundamental early math and science skills. You can build a mud kitchen that focuses on heavy work and organization by incorporating stone and pebble sorting. Build shallow, divided wooden trays into the countertop. Fill the different sections with rocks of varying sizes, colors, and textures. Provide heavy metal scoops and metal buckets. Kids can sort the rocks, mix them with mud, and transport heavy buckets around the yard.
Key Materials
• Shallow wooden sorting trays
• Various rocks (river stones, pea gravel, white pebbles)
• Heavy metal scoops
• Galvanized steel buckets
• Thick work gloves for kids
Learning Benefits
• Provides “heavy work” proprioceptive input, which is highly regulating and calming for the nervous system.
• Teaches early classification, sorting, and comparison skills (big vs. small, smooth vs. rough).
• Enhances hand strength through the lifting and scooping of dense, heavy materials.
Pro Tip
Ensure your sorting trays have small drainage holes drilled into the bottom so rainwater does not pool inside and create stagnant water among the stones.
13. Stump and Log Woodland Kitchen

If you want an aesthetic that blends seamlessly into nature, skip the lumber and plastic and create a woodland mud kitchen entirely out of logs and stumps. Source large tree stumps from a local arborist or firewood supplier. Arrange varying heights of stumps in a circle to act as tables, counters, and seating. Use smaller hollowed-out log pieces as natural mixing bowls. This creates a beautiful, organic play space that looks like it grew right out of the forest floor.
Key Materials
• Large tree stumps (sanded flat on top)
• Smaller stump seating
• Hollowed-out log sections
• Natural loose parts (acorns, pine needles, bark)
• Wooden sticks for stirring
Learning Benefits
• Fosters a deep, aesthetic appreciation for the natural world and forest environments.
• Encourages open-ended, unstructured play without the visual cues of traditional manufactured toys.
• Develops gross motor balance as children step and climb between the different stump heights.
Pro Tip
Seal the tops of the stumps with a natural linseed oil to preserve the wood and prevent the bark from peeling away too quickly, while still maintaining the natural woodland look.
14. Mobile Mud Kitchen on Casters
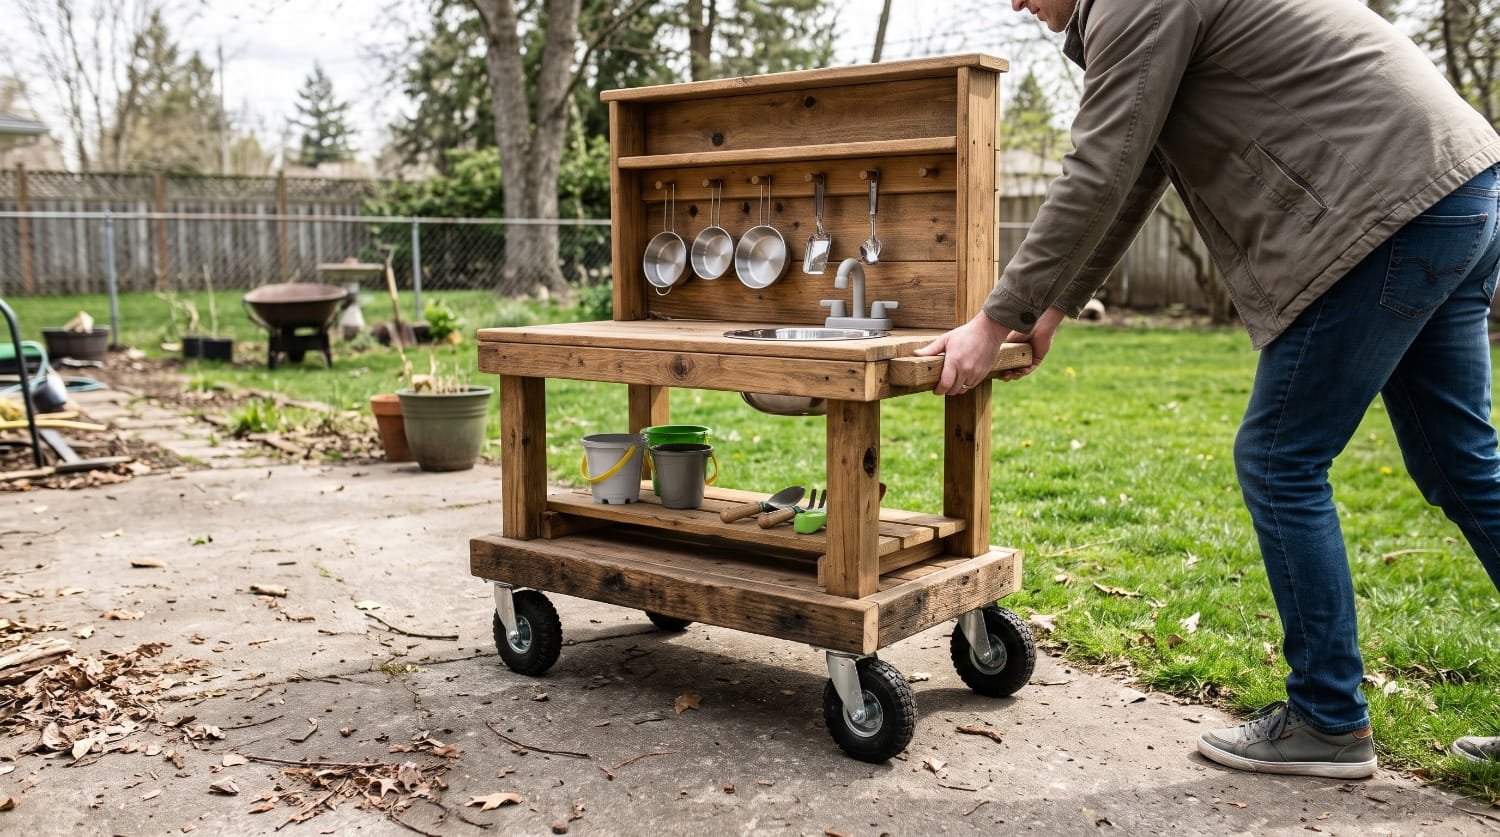
Backyards are multi-use spaces. Sometimes you need the mud kitchen in the shade during a hot afternoon, and sometimes you need to push it out of the way for a family barbecue. Building your mud kitchen on heavy-duty caster wheels offers ultimate flexibility. Construct a solid, heavy base frame for your kitchen and attach all-terrain locking wheels to the bottom. This allows you to easily roll the messy play station wherever it is most convenient for that specific day.
Key Materials
• Heavy-duty locking caster wheels
• Sturdy wooden base frame
• Stainless steel screws and bolts
• Standard mud kitchen setup (bowls, counter, backboard)
• Handlebars attached to the sides for pushing
Learning Benefits
• Allows children to understand spatial planning as they help decide the best location for play that day.
• Encourages adaptable play, as the kitchen can be moved next to the sandbox one day and the garden the next.
• Keeps children safe from the sun by easily migrating the play station into shaded areas.
Pro Tip
Invest in large, rubberized, all-terrain casters rather than small plastic wheels. Small wheels will instantly get stuck in mud, grass, or gravel, defeating the purpose of a mobile kitchen.
15. Color Sorting and Crushed Chalk Station

Combine the chalkboard and the mud kitchen concepts by creating a crushed chalk paint station. Save all the tiny, broken pieces of sidewalk chalk that are too small to draw with. Have the children use a mortar and pestle or a heavy rock to crush the chalk pieces into fine, colored powder. Sort the powder into different bowls by color. Kids can then mix this colored dust with a little bit of water from the mud kitchen to create vibrant, homemade sidewalk paint that they can apply to the chalkboard with thick paintbrushes.
Key Materials
• Broken sidewalk chalk pieces
• Small sorting bowls
• Mortar and pestle (or smooth rocks)
• Thick outdoor paintbrushes
• Small cups of water
Learning Benefits
• Develops color recognition and color mixing skills (e.g., mixing blue and yellow chalk dust to make green).
• Refines fine motor control through painting with brushes rather than just drawing with solid chalk.
• Teaches resourcefulness by repurposing broken, unusable items into something new and exciting.
Pro Tip
If the chalk paste gets too thick, just add more water. When it dries on the chalkboard, it leaves a brilliant, opaque, pastel-like finish that washes off easily with the garden hose.
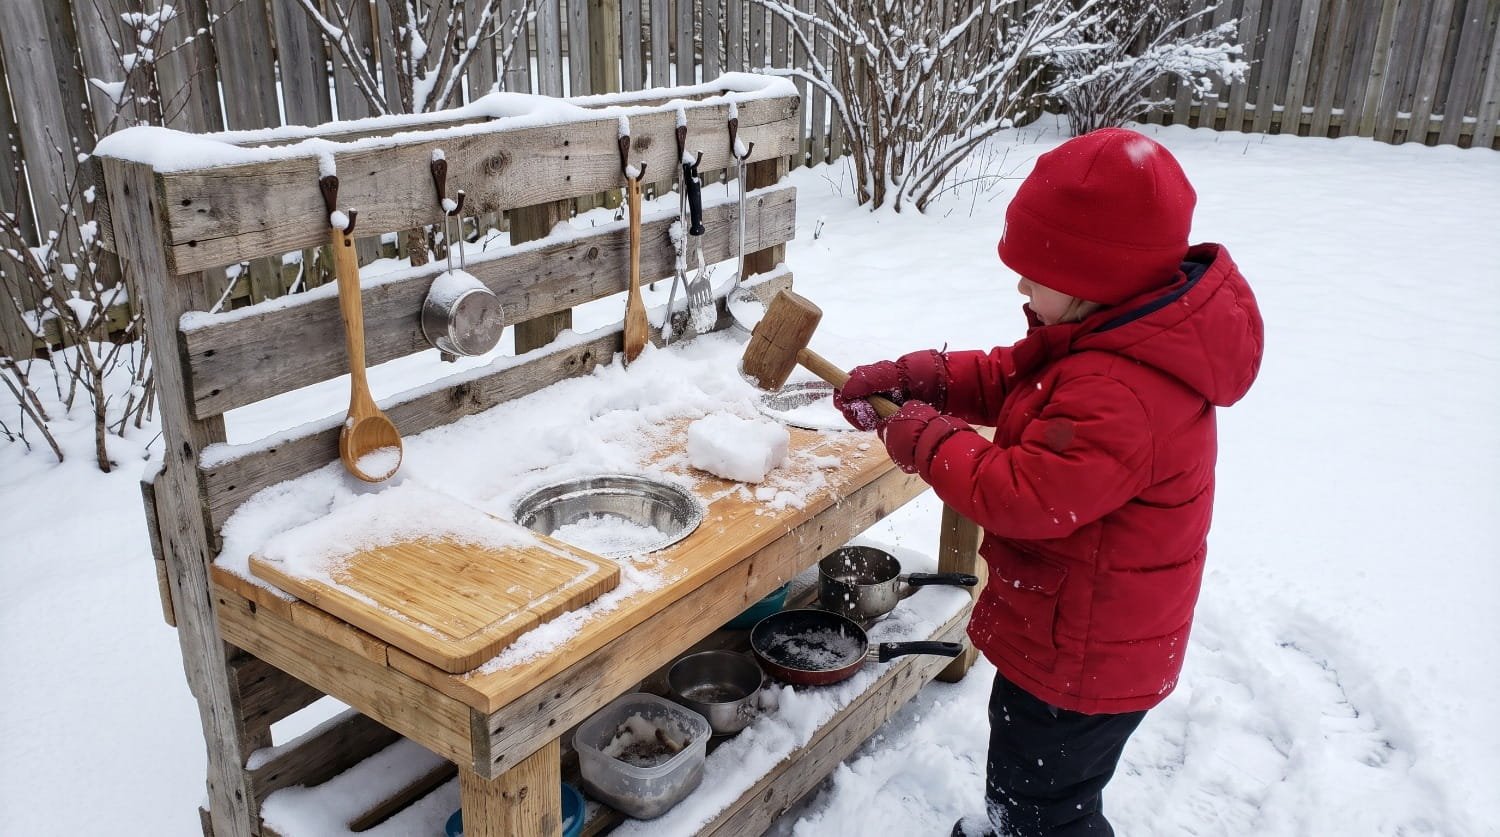
16. Winter-Ready Mud and Snow Kitchen
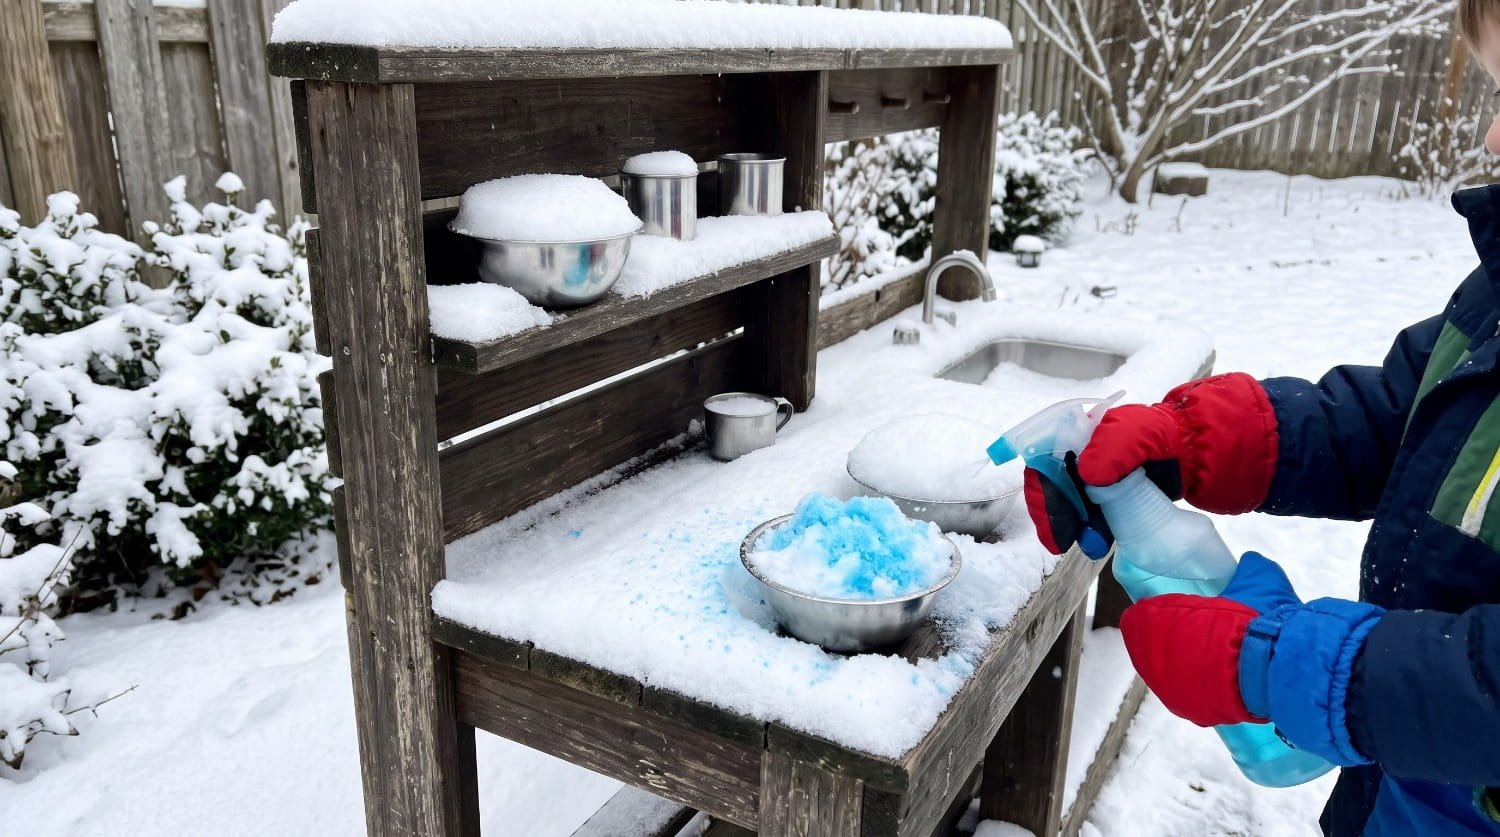
Do not pack up the mud kitchen when the temperature drops. With a few tweaks, it becomes an incredible winter snow kitchen. Swap out the dirt for packed snow and ice blocks. Replace the wooden ladles with heavy plastic scoops that will not freeze and splinter. Fill plastic spray bottles with water and a few drops of food coloring. Kids can spray the colored water onto the snow to create vibrant “snow cones” and colorful ice soups.
Key Materials
• Existing outdoor mud kitchen
• Plastic spray bottles
• Washable food coloring
• Plastic scoops and molds
• Warm, waterproof mittens for the kids
Learning Benefits
• Promotes year-round outdoor play, ensuring kids get fresh air even in the colder months.
• Explores the science of temperature, freezing, melting, and states of matter.
• Builds resilience and sensory tolerance to cold temperatures.
Pro Tip
Remove any ceramic, terracotta, or thin plastic items from the kitchen before the first freeze, as trapped water will expand and crack them. Stick to stainless steel and thick, flexible silicone during the winter.
17. Ultimate Wrap-Around Corner Sensory Hub

If you want to create the ultimate outdoor playroom, combine all these elements into a single, cohesive L-shaped wrap-around hub. Utilize the corner of your yard or fence line. Build the mud kitchen counter along one side and the outdoor chalkboard along the other. In the corner where the two stations meet, install your water pump or wash basin. This creates an immersive, multi-station environment where children can seamlessly transition from cooking with mud to washing their hands, to drawing a menu on the chalkboard.
Key Materials
• L-shaped wooden framing
• Plywood for the chalkboard and counters
• Assorted pots, pans, and chalk
• Centralized water basin or pump
• Overhead canopy or shade sail (optional)
Learning Benefits
• Creates a defined, comprehensive outdoor learning zone that contains the mess to one specific corner of the yard.
• Supports complex, multi-step imaginative play sequences (e.g., writing a restaurant menu, cooking the food, cleaning the dishes).
• Accommodates multiple children at once, making it ideal for large families or home daycares.
Pro Tip
Install an overhead shade sail anchored to the corners of the play hub. This not only protects the children from harsh UV rays during extended play sessions but also keeps excessive rain from flooding the mud and chalk stations.
Creating a sensory-rich backyard does not require acres of land or expensive playground equipment. Whether you upcycle a single pallet into a mud station, mount a chalkboard to a privacy fence, or build an immersive corner sensory hub, you are providing your children with the tools they need to explore, learn, and grow. By giving kids a dedicated space to get messy, make noise, and create outdoor art, you are laying the foundation for a lifetime of healthy, screen-free, imaginative play.